Tutorial Tuesday: How to make a superhero raccoon!

With warm summer air blowing in through the windows here at Juniper Cakery HQ it’s hard not to be inspired by what’s outdoors. The likely hood of a raccoon strolling through our gardens may be about as high as a raccoon donning a cape and mask but that’s what we love about cake decorating…you can be as insane as you like! Our crazy critter tutorials show you how to customise a cake in a fun, novelty way. This superhero raccoon would be a fantastic addition to any comic book fan’s cake and by following this tutorial you have all the superpowers you need to create one of your very own!

Tutorial Tuesday: How to make a sugarpaste raccoon

What you will need:
White sugarpaste/modelling paste
Black & green food colour paste by Wilton
Modelling tool set Fondant roller
Paint brush
Edible glue
Cocktail Sticks

Tutorial Tuesday: How to make a superhero raccoon!

Tutorial Tuesday: How to  make a sugarpaste racoon

Step one: Once you’ve custom coloured your sugarpaste (we chose a black, grey and green colour theme but don’t be afraid to choose your own, or the recipients, favourite colours) take a fair amount of your base colour (we’ll refer to this as grey) and begin rolling it in your hands. Make sure it’s crack free and begin moulding it into a ‘pear’ shape to form your raccoon’s head.

Tutorial Tuesday: How to  make a sugarpaste racoon

Step two: To make your raccoon’s eyes use a piping tip to cut out to circles in a contrasting colour (we chose a deeper grey) and shape them a little so they’re not perfectly round. Roll two very small balls out of white sugarpaste, flatten them with your fingers and place them on top of the deeper grey sugarpaste with edible glue. Paint in some pupils with black food colour paste and a paintbrush to finish your raccoon’s eyes!

Tutorial Tuesday: How to  make a sugarpaste racoon

Step three: Give your raccoon a little nose by rolling a small amount of deeper grey sugarpaste between your finger and thumb and stick in place using edible glue.

Step four: To give your little raccoon ears take to small pieces of your deeper grey sugarpaste and mould two triangle shapes between your fingers. Use the non-bulbous end of the bulbous cone tool to mark where your raccoon’s ears will be placed and glue them on with edible glue.

Step five: To give your raccoon a mouth push the non-bulbous end of the bulbous cone tool into the sugarpaste and paint black.

Step six: With your grey sugarpaste begin moulding a similar ‘pear’ shape roughly the same size as your raccoon’s head to form the body.

Tutorial Tuesday: How to  make a sugarpaste racoon

Step seven: Place a cocktail stick through your raccoon’s body, add a little edible glue and gently slide your raccoon’s head into place.

Tutorial Tuesday: How to  make a sugarpaste racoon

Step eight: For the raccoon’s legs and arms roll out four ‘sausages’, making two slightly smaller than the other, and taper them ever so slightly at one end. Make three marks on each tapered end using your blade tool to add detail to your raccoon’s paw. Fix in place with edible glue.

Tutorial Tuesday: How to  make a sugarpaste racoon

Step nine: Now it’s time to create your raccoon’s little bushy tail! Roll out the remainder of your grey sugarpaste in to a ‘sausage’ and taper at one end. Place a small piece of cocktail where your would like your raccoon’s tail to be placed and surround it with edible glue and fix into place. Add stripes using black food colour paste and a pint brush.

How to Make the Mask

Step one: Using the fondant roller roll out your green sugarpaste (or whichever colour you chose) and cut an eye mask shape out of it using your blade tool. Lay the mask over your raccoon’s eyes to see approximately how far they are apart and when you’re sure place the mask back onto a flat surface and begin to cut the eye holes out.

Tip: If you’re find that cutting the small eye sockets out freehand isn’t working try using the smaller end of a piping tip.

Step two: With your left over green sugarpaste after cutting out the mask cut a long strip of sugarpaste approximately 4 mm thick. Place it around your raccoon’s head to measure and once you have it at the right size stick it into place with edible glue. Cut two small ‘leaves’ out of the green sugarpaste and roll a small ball between your fingers and fix them at one side of your raccoon’s head to create a knot! Now your raccoon is masked!

How to Make the Cape

Step one: Work the left over green sugarpaste in your hands and roll it out once again. Using the blade tool cut out an oblong making one end wavy, two ‘leaves’, two ‘blades of grass’ and roll one small ball.

Step two: Glue your cape into place making sure the wavy end is near your raccoon’s tail and gently work it to make it look as though there is wind blowing through and allow to set. Glue the thicker end of your ‘blades of grass’ to where the cape ends and allow them to meet under your raccoon’s chin. Where they meet glue your two ‘leaves’ and ball into place to cover up the seam and create a knot!

Step three: To create a superhero logo cut a hexagon from white sugarpaste using your blade tool, fix into place with edible glue and paint your chosen logo on with food colour paste.

By following this tutorial you now have your very own superhero raccoon! Why not turn your little critter into your own or your loved one’s favourite superhero? Add a Catwoman or Batman mask over your raccoon’s face (it already has the ears!), work in red and gold to create an Iron-raccoon or add a red, white and blue cape for Wonder Woman!

Tutorial Tuesday: How to make a sugarpaste raccoon


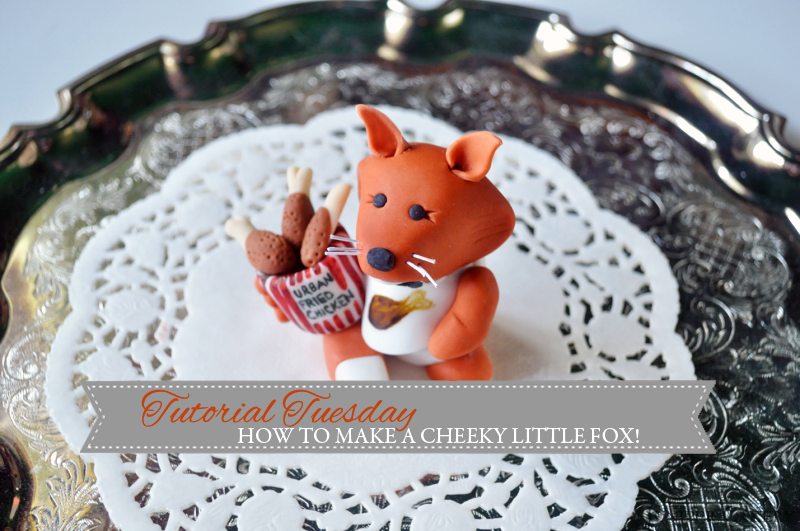
Tutorial Tuesday: How to make a cheeky little fox!

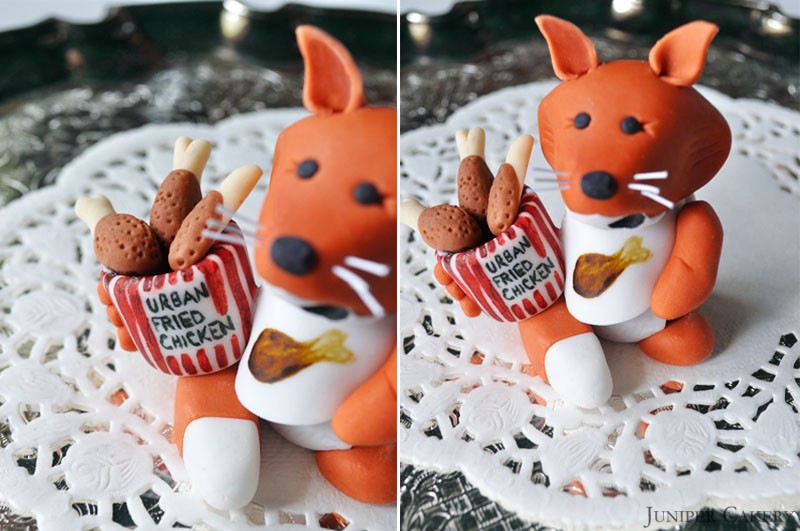
Hello everyone! After a short break our Tutorial Tuesdays are back! We asked what you would like to see featured in upcoming tutorials via our Facebook and we had lots of lovely responses. It would seem that sugarpaste characters and animals proved to be a popular choice and the Juniper Cakery office gardens have proven to be a popular destination for foxes so we though we would create this cheeky little fox for you to re-create! As we made this cute little critter we thought it’d be hilarious and fun to add a bucket of ‘Urban Fried Chicken’ in its arm and a food bib around its neck!

Tutorial Tuesday: How to make a fondant sugarpaste fox

What you will need:

White sugarpaste/modelling paste
Red, brown and orange gel paste (to make a burnt orange colour for the fox)
Set of modelling tools
Red and brown food colour paste (to create the bucket of ‘chicken’)
Black ready to roll icing (for the fox’s eyes, nose and mouth)
Sugarpaste/fondant roller
Edible glue
Cocktail sticks

Tutorial Tuesday: How to make a fondant sugarpaste fox

Tutorial Tuesday: How to make a cheeky little fox!

Step one: Using some of the sugarpaste you custom coloured for your fox roll out a ball ensuring there are no cracks. Begin to ‘flatten’ either side of your ball until you have fanned out ‘cheeks’. Repeat this in the middle of your cheeks but this time taper towards the end and work the sugarpaste upwards with your fingers to create a pointy snout for your little fox.

Tutorial Tuesday: How to make a fondant sugarpaste fox

Step two: Now you have the general shape of your fox’s head use the shell end of you blade and shell tool to add some fur detailing.

Tutorial Tuesday: How to make a fondant sugarpaste fox

Step three: Using the smaller end of your ball tool indent two ‘eye sockets’. Make two small slits with the blade end of your blade and shell tool to add further detail to your fox’s eyes. Now roll out two very small balls using the black sugarpaste and secure them in place with edible glue.

Tutorial Tuesday: How to make a fondant sugarpaste fox

Step four: Make an indentation in your fox’s snout with the non-tapered end of the bulbous cone tool, roll a small amount of black sugarpaste into an oval and fix into place with edible glue. If you would like to add ‘whiskers’ cut six pieces of florist wire approximately 1 1/2 cm long and push in to snout.

Step five: For ears, roll out a small amount of your burnt orange sugarpaste, cut two triangles out approximately 1cm x 1cm and fold in two corners until they’re touching. Make two indentations on top of your fox’s head using the ball tool and fix into place with edible glue.

Step six: Roll out a small amount of white sugarpaste using your fondant roller until it approximately 1mm thick. With your blade tool cut a triangle approximately 1cm x 1cm x 1cm and place it under you fox’s chin. Use the non-tapered end of your bulbous cone tool and gently work the white fondant into the burnt orange fondant until it appears seamless. Now you have your given your fox some traditional markings! For the mouth simply make an indentation using your ball tool and paint black with Wilton’s black food colour paste.

Tutorial Tuesday: How to make a fondant sugarpaste fox

6

Step seven: To create a body for your fox begin rolling out a thick ‘sausage’ shape and make sure you slightly taper one end as this will be the neck. Add further markings to your fox by rolling out a small amount of white fondant and cutting out a ‘raindrop’ shape which will fit on to your fox’s stomach. Attach with edible glue and add fur detailing with your blade tool.

Tutorial Tuesday: How to make a fondant sugarpaste fox

Step eight: To attach your fox’s head to the body push in a cocktail stick, paint the ‘neck’ with edible glue and gently push the head in to place.

Tutorial Tuesday: How to make a fondant sugarpaste fox

Step nine: To make a tail roll another ‘sausage’ shape between your fingers only this time make it much smaller. Taper one end and curve it so it will fit around your fox’s body. Add a white tip by moulding a triangle shape with your fingers attach with edible glue and work with in the non-tapered end of your bulbous cone tool.

Tutorial Tuesday: How to make a fondant sugarpaste fox

Step ten: Your fox’s tail will ‘hide’ the left foot so only one foot needs to be made. Mould a circle with your fingers, press one end down with the ball tool and apply edible glue to stick in to place.

Tutorial Tuesday: How to make a fondant sugarpaste fox

Step eleven: How you make arms for your fox with depend on if you include the bucket of chicken and bib. If you’re making your fox without the extra novelty details roll out two small ‘sausages’, make a small cut about halfway down each ‘sausage’ and bend both ends in at this point. Taper one end to form a ‘paw’ and attach both arms with a small piece of cocktail stick and edible glue. To make and put together the fox’s arms, bucket of chicken and bib see below.

How to Make the Bucket of Chicken

Step one: Mould a ‘marshmallow’ shape out of your white sugarpaste and push in the larger end of the ball tool to create the inside of your bucket. If this forces your bucket out of shape simply work it once again until it regains the appropriate shape.

Step two: For the chicken; using your custom coloured sugarpaste roll out a very small ‘sausage’ shape and round one end but cutting and shaping the fondant to look like a traditional cartoon-like bone.

Step three: Roll ovals of brown fondant and push them down on top of the bone until they cover one end. Fix in to place with edible glue and mottle using the end of the bulbous cone tool.

Step four: Paint your bucket of chicken with red stripes and add a logo of your choice (we chose ‘Urban Fried Chicken’). Glue your chicken pieces in place.

Step five: Roll three small balls of your burnt orange fondant and stick them next to one another on the left side of your bucket. These will be your fox’s ‘fingers’.

Note: Only one arm is needed if you’re adding the bucket of chicken. The ‘fingers’ will give the illusion of the bucket being held by your fox.

Tutorial Tuesday: How to make a fondant sugarpaste fox

How to Make the Sugarpaste Bib

Step one: Roll out the remainder of your white sugarpaste and cut out a large ‘U’ shape with a thick bottom.

Step two: Use up the cut offs of rolled icing and cut out two small petal shapes and roll one small ball. Once your fox’s bib is in place glue the two petal shapes where the bib meets and glue the ball in the middle. Now you have a knot where your fox tied the bib!

Step three: Customise the bib by painting a chicken leg or ‘drumstick’ in the centre. Simply use different tones of brown food colour paste and a small paint brush to pain the design.

Note: Once the bib is in place the arm can be fixed on top.

If you’ve followed this tutorial step-by-step you now have your very own cheeky little fox! Sugarpaste characters like this are perfect for creating silly, novelty cakes for loved ones. Why not be inventive and turn this little fox into any character you like! If a relative loves music add some headphones, if they love sports swap the bucket of chicken for a basketball or football or if they love movies turn the bucket of chicken into a bucket of popcorn; the options are endless!

Tutorial Tuesday: How to make a fondant sugarpaste fox


×